Showing posts with label D-feast Friday. Show all posts

Friday, April 27, 2012

Meggins and Patterns.

The internet can be a pretty smart place.

There are certain things I'm not going to go online to find answers for - I won't, for example, ask someone what my insulin to carb ratio should be, or start taking certain vitamins because I see that someone else is. That's not really the role of this whole online health-related space - that's for a doctor and a patient to sit down and discuss.

What I do use social media for are things like suggestions for new foods to try, a reassurance that I'm not the only PWD who has a gusher/rarely changes their lancet/spends hours above 300 sometimes/thinks CGMs are the best things since sliced cheese. (Bread is overrated.)

I recently posted on my Facebook page that I was looking for new ideas for low-carb breakfast options that I could eat on the go. We've gotten into a food-related rut of sorts in the Vlasnik household, and I have been seeing numbers higher than I'm comfortable with after breakfast each morning during the week. For a while. Like, I've been in the 200's after breakfast for weeks and I've done pretty much nothing to work on it.

Sigh.

Several of the suggestions centered around "egg muffins" of a sort. (Muffin eggs? Muggins? Meggins? Eggfins?) Given that we had some asparagus, bacon and cheese on hand, I gave it a go. And guess what?


THEY WERE DELICIOUS. And I topped out at 182... not bad.

There is no real recipe; I just scrambled up some eggs (I added a splash of milk) and threw the rest of the ingredients in; baked for 25 minutes on 350 heat... boom! Breakfast, you got served!

And secondly, I'm kind of bad at spotting patterns. (Maybe you knew this already.) Case in point:
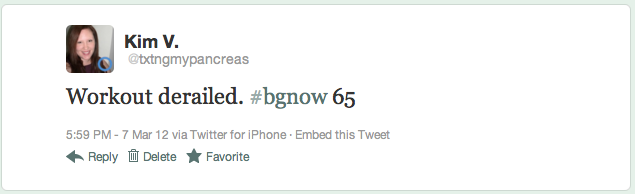
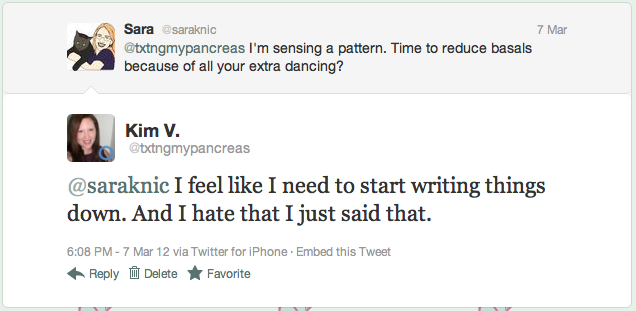
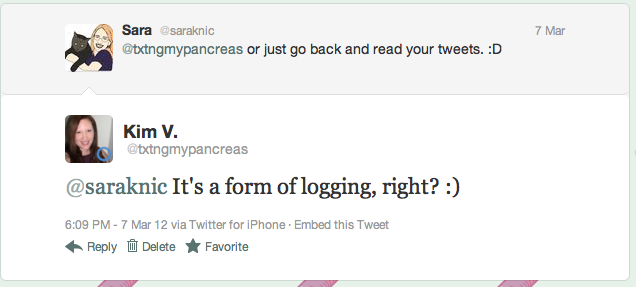

I'm glad someone could see a pattern, because I sure failed to notice it. My adjusted basal rates thank you, Sara.

The internet: useful in ways that continue to astound me.

Friday, January 13, 2012

Pinterest Is To Blame For This.

I made this a couple of weeks ago, but forgot to mention it on Ye Olde Blogge, so here it is.

My friend Meredith found a recipe on Pinterest that involves both avocado and eggs, so I was totally game to try it out. And it's so super easy! I wasn't a huge fan of the textures, but someone else might think it's totally awesometown.

Here's what the picture looked like on Pinterest:


And here's what they looked like when I made them (plus some lemon bread):


Not quite as pretty, right?

Here's what you do, via the Apron Strings Blog:

Heat a non-stick skillet to medium low heat. Lightly spray with oil. Slice an avocado with the skin ON lengthwise, forming one thick slice in the middle. (You will have some leftover avocado pieces – so, Hey! Make some bonus guacamole if you want! Guacamole for Breakfast? Why NOT? It’s the Holidays!) Remove the seed and use a small cookie cutter {Editors note: or, you know, a spoon.} to make a hole in the center of your thick slice. Place the avocado slice in the pan. Crack a medium sized egg into the center of the hole. Cover and cook for a minute or two, until the egg is as you like it. Season with salt and pepper and serve.

I feel like I didn't cut enough of the avocado out, so my eggs spilled over everywhere. (Is that an eggalanche?) So watch out for that.

Monday, December 12, 2011

So Good You'll Want To Quiche It.

That was the best quiche pun I could come up with.

Sorry.

Anyway.

If we're not Facebook friends, you might not realize that over the past two weeks, I've turned my kitchen into a fine-tuned holiday carb-producing machine.


I've been baking Christmas cookies, pumpkin bread (last night, and my house still smells yumm-o), and last weekend I - for the first time ever - made quiche. And I'm in love with it!

It's super easy. You'd have to try pretty hard to mess it up. And pretty much anything flies - throw whatever veggies you want, bacon, sausage, ham, cheese of every kind, etc. It all works.

Plus? If you're cutting it into 8 slices (and packing each piece separately to be reheated for breakfast each day during the week, as I did), each serving of the pie crust is only 12g of carb. TWELVE!

If you want to give it a go, here's the recipe I used.

OLD COUNTRY QUICHE

1 9-inch unbaked pie crust (Pillsbury is what I used)
1 tsp. butter/margarine
1 small yellow onion, chopped
2 cups shredded Swiss (though I'm told that Sharp Cheddar works better)
6 slices lean bacon, cooked and crumbled
2 Tbs. all-purpose flour
3 large eggs
1 cup low-fat milk
Optional: 1/4 tsp. salt and 1/8 tsp. ground nutmeg (I didn't use these)

Heat oven to 400 degrees. In a small non-stick skillet, melt the butter over medium heat. Add the onion (BTW, I thought the whole onion was way too much. Use at your own risk. I thought half of it would have been plenty, thank you.) and sauté for five minutes, or until soft.

Roll out your pie crust and stuff into a pie plate (or, if you're fancy, a specialty quiche plate).

Transfer onion to medium-sized bowl. Toss with the cheese, bacon and flour. Spread in pie crust.

Using the same bowl that you just emptied, whisk the eggs with the milk (and the salt and nutmeg, if you like). Pour over pie mixture and bake uncovered for 35 minutes - or until center is set and top begins to brown slightly. Makes eight servings!


P.S. I also want to wish my Mom a very happy birthday today! (And thanks for sharing your quiche recipe!)


Friday, April 15, 2011

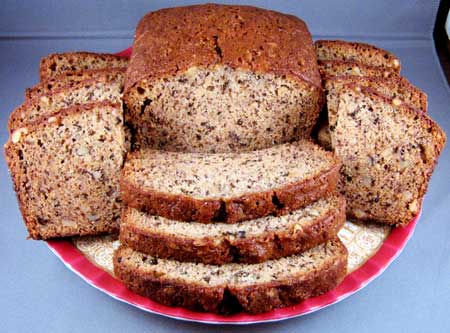
D-Feast Friday: Raisin Nut Banana Bread.

This is the only kind of bread I've ever tried to make, and it has turned out totally awesome each time.

Except for the times it has sunk in the middle. But I blame that on the silicone bread pan I use.

Anyway - this isn't low carb or anything, but it's yummy and that's why I'm sharing it.

Happy Friday!

Ingredients:

2 cups of Raisin Nut Bran cereal (Yes, I realize the irony here.)
1/2 cup milk
1 1/2 cups all-purpose flour
2 medium ripe bananas, smooshed (Or "mashed", if you want to get all proper.)
1/2 cup granulated sugar
1/2 cup packed brown sugar
1/2 cup vegetable oil
3 1/2 tsp. baking powder
1 tsp. baking soda
1 egg

And Here's What You Do With Them:


This is what bread looks like.
Not this bread - but, you know, in general.
Heat oven to 350 degrees. Grease bottom of 9 x 5 x 3" loaf pan.

Stir together cereal and milk in large bowl; let stand five minutes or until cereal is soft. Stir in remaining ingredients. Pour that mess into the pan.

Bake about 50 minutes, or until stabbing it leaves no evidence on the offending toothpick. Cool for 5 minutes; then loosen sides of loaf from pan. Flip that sucker upside down on a wire cooling rack, slide the bread out, then prop it back up the way it should be, and leave it alone for a while before slicing.

Wrap tightly and store at room temperature up to 2 days, or freeze up to 3 months. (That's the official version - I can tell you that it lasts much longer than a couple days on the counter.)

Nutritional Information, per 1/24 of loaf:  105 calories, 18g carb, 1g fiber, 2g protein, 3g fat, 10mg cholesterol, 170mg sodium.

Friday, February 18, 2011

D-Feast Friday: Baked Tomatoes.

I absolutely love this recipe, which was created by one of my best buds (the one in Kansas City). It made a great breakfast this past weekend when I attempted it, and Aaron agreed with me that we'll be making it a part of the regular rotation.

Baked Tomato with Egg and Pesto

Preheat your oven to 425 degrees, with the top rack up as far as it will go. (Those are her instructions - I had to put it down one notch, as the "top shelf" usage woke my smoke alarms up. I'm a bad broiler.)

Cut about the top 1/8 off of the tomato and "gut" it out. (I used a melon baller/scoop, because it's easier and doesn't scrape the sides, but a regular ol' spoon will work too.) Place it, or as many as you're making, in a ceramic or stoneware baking dish sprayed with oil/Pam/whatever. If the tomato doesn’t sit upright in the dish, just bevel the bottom of the tomato by cutting off a tiny sliver to make it flat.

Spoon about a tablespoon of pesto - I bought the stuff in the jar, or you can make your own, if you're ambitious - into the bottom of the hallowed tomato, and crack one egg into it.


Season with salt and pepper to taste, and bake for 20 - 25 minutes until the egg whites are set and the yolks are a little bit runny, still.

Then, take the tomato(es) out of the oven and turn your broiler to "high". Sprinkle (or smother - whatever, I don't judge) with a shredded cheese. I used mozzerella.  Broil for 4 - 5 minutes, or until the cheese starts to get crusty and golden.

I counted the tomatoes as a "free food", but did serve it with some golden yukon potatoes (they have a lower GI than Russett potatoes, which is handy) that I cut up and tossed with olive oil, salt and pepper.

Ta da!

Friday, November 26, 2010

D-Feast Friday: Sweet Potato Biscotti.

I know what you're thinking:  anything with the term "feast" in it has no place in a post on the day after Thanksgiving.  The last thing you want to think about is food.

This one's pretty light, though, and made a yummy mini-breakfast yesterday, paired with some coffee (of course).  It even got a thumbs-up from A, too!

(Disclosure:  the nice people at the North Carolina Sweet Potato Commission sent me a free sample of this biscotti, in the hopes that I'd mention the ol' sweet potato here.  Considering the fact that I already loved those yummy orange dudes, I said, 'Sure!'.)


Sorry, the recipe doesn't call for the pretty bow.  That was
just a bonus.

Sweet Potato Biscotti

2/3 cup sugar
1/4 cup butter, softened
2 large eggs
2 cups all-purpose flour
2 teaspoons baking powder
1 teaspoon grated orange zest
1/2 teaspoon salt
1 1/2 cups unpeeled coarsely grated sweet potatoes (about 8 ounces)
1/2 cup finely chopped walnuts
1/2 cup sweetened shredded coconut

Preheat oven to 350 degrees.  Lightly grease large baking sheet. 

In medium bowl, beat together sugar and butter; add eggs; beat well.  Add flour, baking powder, orange zest and salt, beat on low speed until combined.  Fold in sweet potato, walnuts, and coconut.  Divide dough into two equal pieces; with oiled hands, shape each piece into a log about 2 inches by 11 inches; place on baking sheet.

Bake until firm and golden, 25 to 30 minutes.  Transfer to cooling rack; cool 15 minutes.  Trim thin slice from ends of logs; cut logs into 1/2-inch-thick slices.  Place slices on 2 ungreased baking sheets with cut side down.  Bake 12 minutes; turn and bake until crisp and golden, 10 to 12 minutes longer.  Cool completely.  Store in tightly covered container.

Yield:  about 4 dozen biscotti

Nutritional information provided, per 2 biscotti:  16g carb, 116 calories, 1g fiber, 7g sugar, 5g total fat.

Friday, October 22, 2010

D-Feast Friday: Shrimp, Tomato and Basil Risotto.

This is a recipe adapted from "Junior Master Chef Australia".  (Is that a real thing?  I don't know; I found it through Google.)  Everything was measured in liters and kg, soooo...  I just guessed a lot.  Here's roughly what I did.  I made it Monday night, and it was delicious!


Ingredients:

32 oz. low sodium chicken broth
1 leek, finely sliced (I didn't do this.)
1 1/2 cups Arborio rice
2 tbsp-ish of olive oil
20 or so frozen shrimp - I used a bag of Target brand ones that were already detailed, deveined, etc.
2 garlic cloves, pressed or crushed
A splash of white wine (I totally didn't measure.  "Yep, that looks good.")
A handful of grape or cherry tomatoes, cut in halves
1-ish cup of loosely packed fresh basil leaves, shredded
1/2 cup cream

Serves four, or two really hungry people.

Directions:

Heat chicken broth in a saucepan on medium heat until almost simmering.  Reduce heat to low.

Heat 1 tbsp of oil in a large heavy-based pan over medium heat.  Add leek (or don't) and cook for 2 minutes or until soft.  Add the rice and stir until well coated with oil.

Add a ladleful of broth to the rice, stirring until the liquid is almost absorbed.  Continue the process, adding a ladelful of broth at a time until the rice is almost cooked.  This should take about 15 minutes.  Place lid on risotto, and set aside.

Heat other tbsp of oil in another large pan over high heat.  (Sorry, you're going to be doing a lot of dishes later.)  Add the shrimp and cook for about 2 minutes, turning once until just cooked.  Add wine and cook for one minute or until wine is reduced by 1/2.  Add tomatoes, basil, cream, and garlic and cook for another 2-3 minutes or until the cream sauce has thickened slightly.

Gently stir shrimp mixture into the risotto, or pile on top.  Garnish with basil leaves, if you're fancy.  Enjoy!

Friday, October 8, 2010

D-Feast Friday: Cream Cheese Penguins.

As a follow-up to yesterday's No D-Day post, I'm sharing how to make the adorable little dudes known as Cream Cheese Penguins!

Ingredients:
18 or so jumbo black olives, drained and dried off
1 oz. of reduced fat cream cheese, softened
18 or so small black olives
1 carrot, peeled


Directions:
Cut a slit in the side of each jumbo olive, lengthwise.  Okay, that was the easy part.

If you want to get fancy, scoop the cream cheese into a Ziploc bag, and snip off one of the corners. If not, use a knife to carefully fill the jumbo olive with cream cheese.  If you're using the bag, fill that sucker.  Make sure the cream cheese is really packed in there.  We don't want him to be easily smooshed.

Cut the carrot into about 1/4" slices, and cut out a notch for the foot (keep the notch - this is the beak!).  Stick the jumbo cream cheese-filled olive on top of the carrot slice.  Hey, it's sort of looking like a penguin torso.

Set a small olive on top of the large olive for the head, with the top facing forward (so you can stick the beak in there, pointy side out).  Stick a toothpick vertically through the whole thing.

Do this 18 or so times until you have a small village of penguins.

Admire your hard work, but not for too long.  Those things need to be kept refrigerated.

Enjoy!

Friday, September 10, 2010

D-Feast Friday: Have I Mentioned My Love of Salads?

I love salads.  I eat a salad probably 4 out of 5 lunches during the week, and I often order them if we go out to dinner (which is almost never, but still).  I found this recipe in one of my Real Simple magazines, and it's got so many of my favorite things, that I felt compelled to share the yummy.  Enjoy!


image credit: Real Simple Magazine

Roast Beef Salad with Goat Cheese and Balsamic Vinaigrette

How long from ingredients to Nom Nom Nom:  15 minutes            Serves 4

2 small heads Boston lettuce (also called 'butter lettuce'), torn into pieces
12 ounces sliced deli roast beef
1 large beefsteak tomato, cut into wedges
1/2 red onion, sliced
4 ounces soft goat cheese, crumbled
1/4 cup extra-virgin olive oil
2 tablespoons balsamic vinegar
2 teaspoons Dijon mustard
Kosher salt and black pepper

-Divide the lettuce, roast beef, tomato, onion, and goat cheese among bowls.

-In a small bowl, whisk (or use a fork, if you're unfancy) together the oil, vinegar, mustard, salt and pepper.  Drizzle over salad.

DONE!

Friday, August 13, 2010

D-Feast Friday.

Last night at the grocery store, A and I decided to start out with some drinks from the coffee stand they have there. (Who drinks espresso at 8:00 at night? I do, I do!)  After I had asked the teenage girl working there about nutritional information, she compliantly pulled out a beefy binder, and looked up my chosen drink for me. 44g of carb? Yikes. Maybe I shou… well, okay, fine, I talked myself into it. (Coffee is a weakness.)

I pulled out my Ping and was ready to dial myself up a bolus, when I saw the screen and though, “Crap.” I had planned to refill my pump after I’d eaten dinner, but completely spaced it off, and now I was had 1 unit remaining. (Hey, I had puppies to post – who had time to think about anything else?) Luckily, in the last few months I’ve convinced myself that carrying a backup Humalog pen is a good idea. I hadn’t said anything to A about the situation yet, so when he saw me get out a pen and start dialing up, he said “Oh, wow, you’re going old school. Is your pump out?” “Yep.”

I had lifted the bottom of my shirt a bit and was cranked back, ready to inject. Since my infusion site was on my upper stomach, and my pump was on my hip bone, some of the tubing was exposed along with those few inches of my stomach. Never being one to miss an opportunity to make me giggle (even when the timing isn’t great), A waited until the last second to loudly whisper in a pseudo-panic, “Don’t stab the tubing!!”

I don’t know why that made me laugh so hard, but it did. Let it be noted: laughing is not the best thing to be doing when you’ve got a shard of metal in your stomach at that moment.

So, now that I've shared the lead-up story, I’m going to participate in D-feast Friday and share a recipe. Well, it’s not a recipe really – more of a recommendation.  If you use creamer in your coffee, I highly suggest this stuff. It’s amazingly delicious, gluten-free, and low carb.  Ta da!